UOX3 Quick Start Guide
First, download and install the UO client, as well as either ClassicUO (open source client) or Razor (assistant tool with encryption removal), or both if you want to use them together (setup instructions here).
Note: While ClassicUO is available for Linux and macOS platforms, the UO client's data files are still needed. Try installing UO using Wine, or bring over the files from an existing install on Windows.
 Ultima Online (Classic Client)
Next, if you haven't already done so, go ahead and download UOX3:
Adjust UOX.INI Settings
Extract the downloaded UOX3 package, then open UOX.INI and modify the following settings:
- SERVERNAME - Name of your shard
- EXTERNALIP - Your shard's Internet IP (if any)
- CLIENTSUPPORT# - Client ranges allowed on your shard. Keep as specific as possible.
- DATADIRECTORY - Path to UO Client folder, or UO data files
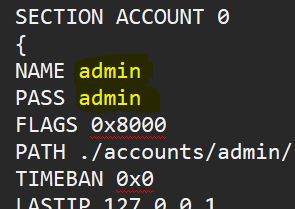
Setup Admin Account
Next, open UOX3/accounts/accounts.adm and change the default NAME (username) and PASS (password) of account 0 to something other than admin/admin, and save the file.
Start your shard by double-clicking UOX3.exe (Windows) or running terminal command ./uox3 (Linux/macOS).
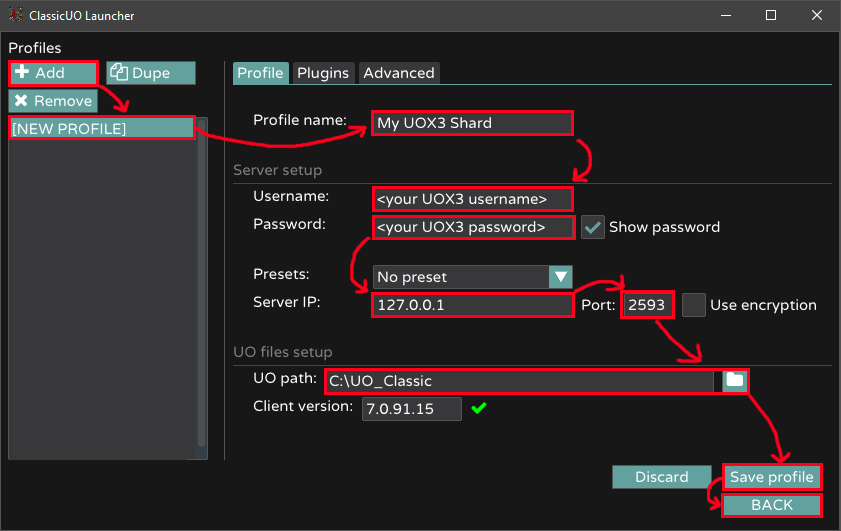
UO + ClassicUO
Start ClassicUO, add a new profile with your shard's IP, path to UO client, etc. Save and hit "BACK", then select newly added profile and start UO!
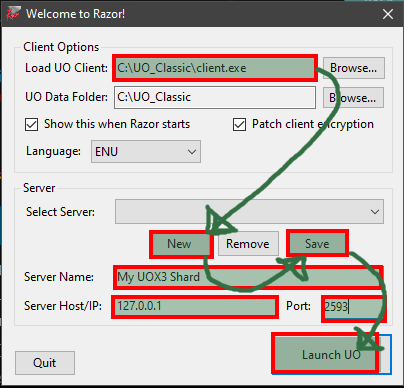
UO + Razor
Right-click on Razor.exe, choose Properties > Compatibility tab > Run this program in compatibility mode for Windows XP (Service Pack 3). Apply and close file properties, then start Razor.exe. Load the default profile, then enter your shard's details (name, IP, port), the path to your UO folder. Hit "Launch UO" to start UO!
Logging in to your shard
Finally, with the client open, enter the username and password you set in accounts.adm, login and create your first character!
Additional resources to look at to get you going with your shard administration:
- First Five Minutes - Short guided tour of UOX3 found in the UOX3 Documentation (Recommended)
- UOX3 Command List - List of commands usable by Admins/GMs
- Feature Documentation - Section of UOX3 Docs that provide details about the various features supported by UOX3
- Community Forums - Browse thousands of posts by other users for inspiration, extensions and support
- Discord - Connect with other UOX3 users (and devs) in the UOX3 Discord server